Montessori Inspired: Godly Play
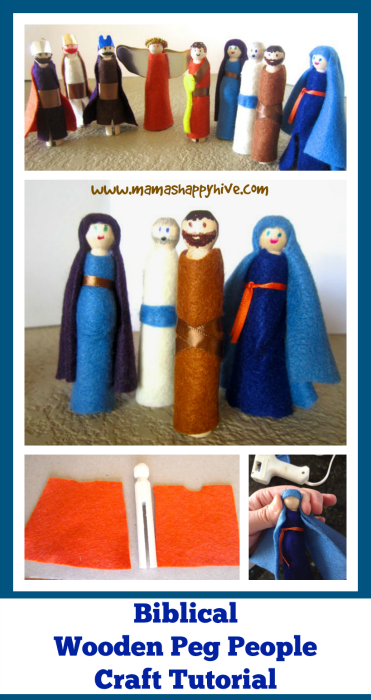
If you haven't already noticed, I love to craft and make up my own DIY materials for learning through play. In our home, we follow a Montessori inspired homeschooling format and I love to bring in the beauty of wooden toys. However, a lot of the wooden toys/materials are expensive. So I enjoy saving a few pennies by crafting my own materials. These Biblical wooden peg people were inspired by my love for all things Montessori as well as the beauty of Godly Play. You can read more about Godly Play on the Christian Montessori Network blog. Please visit, Creating Your Own DIY Godly Play Materials.
This is day 3 through 6 of the 25 day series - 25 Hands-On Nativity Lessons for Kids.
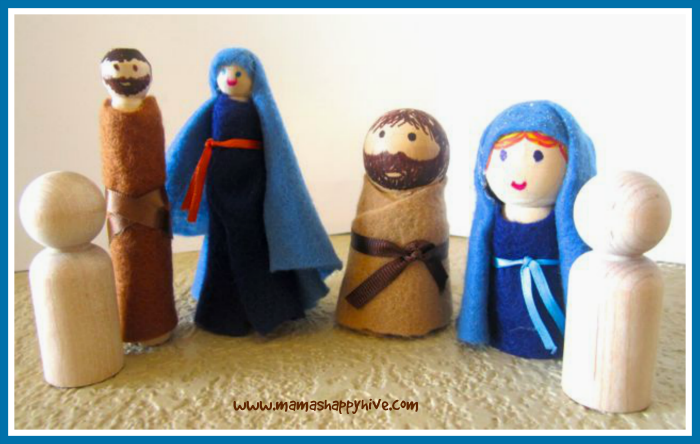 First of all, I wanted to point out that there are different shapes and sizes of peg people to choose from for crafting your very own set of Biblical people. This set is part of a nativity series of crafts. I decided to use the skinny "clothes pin" peg people for the 25 day series because they can actually "ride" the cardboard camels and donkey that I will be posting a tutorial about soon. I thought this idea was super fun and it was inspired from this blog post, The Adventures of the Peg Dolls.
I found my wooden peg people at a local craft store like Hobby Lobby and Michael's. The wooden peg people can also be found on Amazon. Here is a link for the clothes pin peg people.
Materials Needed for Biblical Peg People Craft
- A bag of 10-20 peg people (pick your favorite size) & clothes pin peg people
- Different colors of square flannel material (approximately 12 in x 12 in squares) - Dark Brown, Light Brown, Blue, Purple, White, Orange
- Different colors of magic markers - Black, Brown, Orange, Blue, Yellow, Green, Pink/Red
- Hot glue gun and extra glue sticks
- Different colors and sizes of ribbon
- Scissors
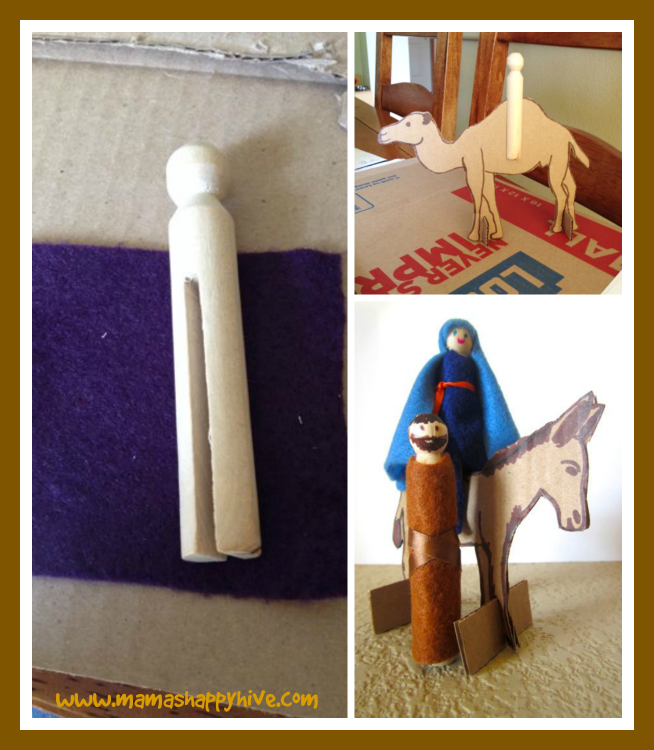 I am going to give you general instructions for crafting both a Biblical man and woman. Please feel free to be creative in crafting your very own unique people. Tip: Please note that is it important to practice drawing the face and hair (with magic marker) on the peg person before hot glueing their outfit on. I learned this the hard way, when I had gone through all the trouble of crafting the outfit and then messing up the face of the doll. When you draw the face, keep it simple (unless you are an artist). It's very easy to make the face look funny by doing too much. Two dots for eyes and a small smile for a mouth is really all you need, unless you want to try getting creative with drawing a beard.
Crafting Peg People Instructions
1. Start by rolling your peg person in the flannel material and cutting a small slit in the material at the edge where the peg person has been completely rolled up in the material. 2. Cut straight down and then measure the peg person next to the edge of the material for the height of the outfit from neck to feet. Again cut a slit at this marking. Finish cutting out the outfit in a small square as pictured below. 3. Next cut a small semi-circle for a cute neck hole and a slit up the middle for the clothes pin peg person who will be riding on a cardboard animal. Otherwise, if the peg person is not riding a cardboard animal, do NOT cut the slit in the middle. 4. The number 4 picture below shows the different ways of cutting out an outfit for the peg people. The more triangular outfit on the left creates more of a flare in the outfit. See this post on crafting an angel with a flared outfit - 7 Christmas Angel Crafts. 5. Put a line of hot glue along the edge of the curved neck in the front and attach the outfit to the peg person. Next, turn the peg person over and glue down one edge of the flannel to the back of the neck and then overlap the other side by glueing that edge down (see picture). After that, place a line of glue down the vertical edge of the garment and press the two pieces together. Trim the bottom edge of the garment around the feet if it is needed to make it even. 6. If you want to create an optional pregnant woman - before glueing the flannel seam together down the back of the peg person, take a small ball of flannel scraps and roll them up. Gently place the rolled up ball inside the flannel outfit at the stomach level and then proceed with glueing the flannel seam together in the back of peg woman. The last step is adding the finishing touches with a ribbon around the waist of the doll. See the photos for different examples of how to tie the ribbon. 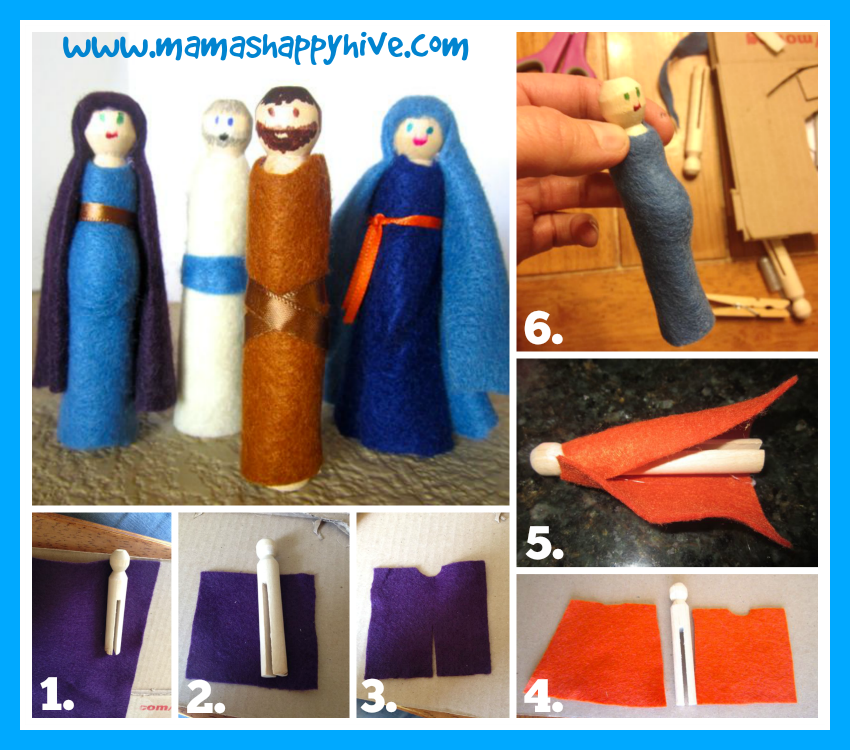
Biblical Peg Women Instructions
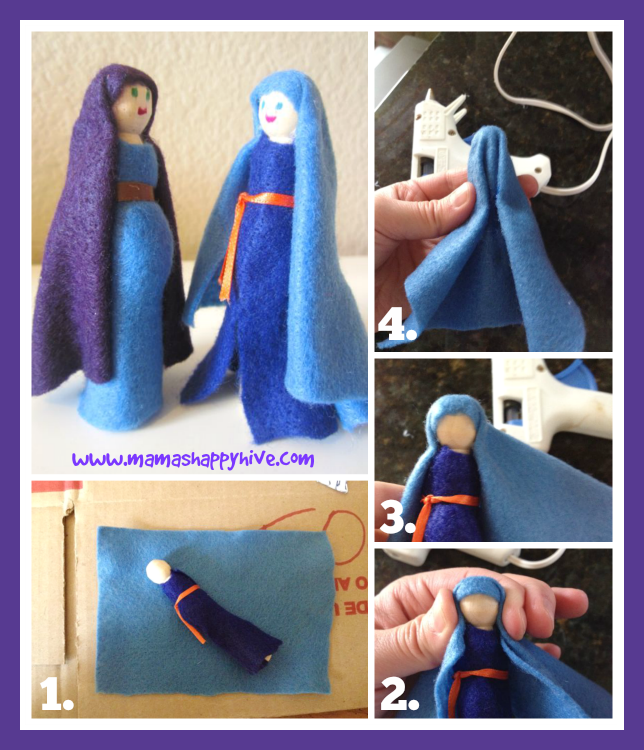
The next series of photos are for crafting the head covering for the Biblical peg women. 1. Cut a rectangular piece of flannel with the size in proportion to the peg person. (See the photo below) 2. Place the peg person in the middle of the longer edge of the rectangle. Put one dot of hot glue on top of the peg persons head. Place the flannel over the head of the peg person and pinch down the sides around her face. Have a the hot glue gun ready to glue in your other hand. 3. Place two dots of glue right at the base of the peg persons face/neck. Press the flannel down and hold tight for few seconds. Do not burn yourself. 4. Turn the peg person over and place two lines of glue down the back of the peg person to glue down the head covering in back as shown in the picture below. Finally, trim the edges of the head covering at the base to create an even edge.
 Thank you so much for your visit. If you loved this post - please share!
You may also enjoy visiting my friend Heather's blog post entitled, Nativity Sensory Bin. She also has a wonderful and easy tutorial for crafting peg people.


What a lot of work, but they would last through the telling of so many stories!
Thank you for always stopping by Laura!
What a cute activity! Love it! Thank you for sharing!
It’s fun! Thanks for visiting!
Vanessa, I laughed out so loud when I saw how the clothes peg fits perfectly on top of a donkey cutout!!! That is sooooo awesome!!! I think for a toddler, it shows them EXACTLY how to ride an animal (since we can’t actually do it right now in the middle of all this snow.) I gotta try this if I still have time this Christmas. Thanks for the tutorial!
were do you get the wooden pieces
Did I miss that?
I find them at a local craft shop – Michael’s & Hobby Lobby. They are also on Amazon – Here is a link: http://www.amazon.com/Hygloss-Decorative-Wooden-People-Assorted/dp/B0044S1CRE/ref=sr_1_2?ie=UTF8&qid=1438960985&sr=8-2&keywords=wooden+peg+people
Thank you for pointing this out to me! I updated my post to include links for how to find the peg people.
Thank you for sharing this! We’re just beginning to set up our GP area at home and this is a great idea. The carved pieces you can purchase are so expensive! I’ll have to try this way instead.
Thanks for commenting and I’m so glad you are having fun setting up your Godly Play area.
I’m going to have to do this with my girls this Christmas, they would love it. Such a cute idea!
Thank you! Have fun!