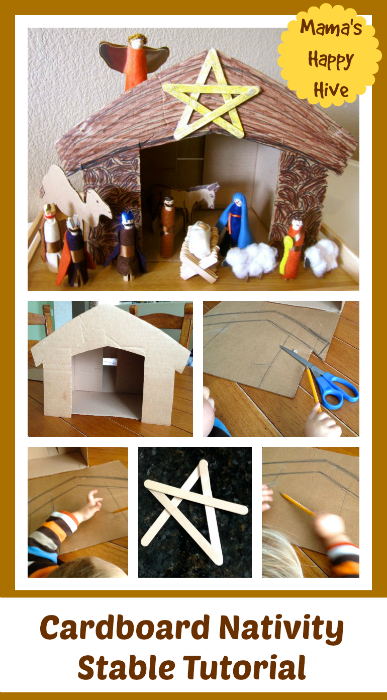
This easy cardboard nativity stable tutorial is perfect for children who can help design this simple structure. It's also a fabulous backdrop for your children to use while playing hands-on with the nativity people and animals. Please visit, Biblical Wooden Peg People Craft Tutorial.
This is day 8 of the 25 day countdown series - 25 Hands-On Nativity Lessons for Kids.
Materials Needed to Craft the Nativity Stable
- Small cardboard box and flat cardboard panel that almost doubles the size of the box (see the photo)
- Pencil
- Copy Paper
- Stapler and staples
- Brown and Black Magic Marker
- Place the flat cardboard panel centered in front of the small cardboard box.
- Draw lines on the flat cardboard panel for the beginnings of an outline for the width of the sides for the front (face) of the nativity stable. (Lined up on both sides of the vertical edge of the cardboard box.) Please look closely at the picture above.
- Next, place the box on top of the flat cardboard panel - centering it within the lines that were already drawn. Draw the bottom part of the roof line about 1/3 of the way down the small box.
- Sketch with a pencil the lines together to create the sides of the stable (face or front of the stable) and also complete the lines for the roof line.
- Please note that the bottom edge of the roof line drawn in the picture above had to be modified to come down farther, so that the top horizontal edge of the box didn't show.
- I cut four pieces of regular copy paper into small rectangles. I folded them in half and stabled one edge to the cardboard box. (See photo above)
- After cutting out the front of the stable from the flat cardboard panel, I stapled it onto the box frame as shown in the photo above. Lastly, let the children decorate the nativity stable with magic markers.
Glitter Popsicle Stick Star
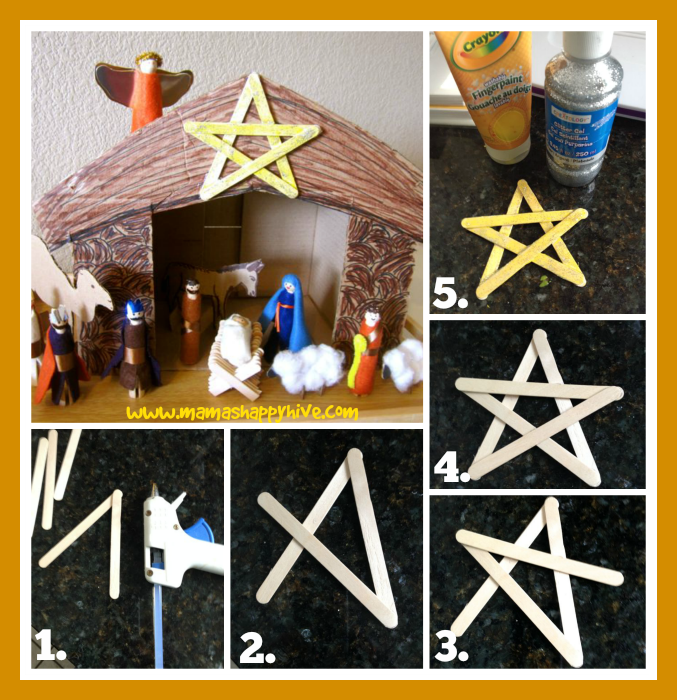
Make a beautiful glitter popsicle stick star to adorn the front of the nativity stable.
- You will need 5 popsicle sticks and a glue gun. Start by glueing the two popsicle sticks together in an upside down V shape.
- Add another dot of glue to the bottom edge of the V and place the third popsicle stick in place as shown in the photo above.
- Place a dot of glue on the edge of the third popsicle stick and place the fourth stick as shown above.
- Complete the star by glueing the fifth popsicle stick into place.
- Let the children paint or finger paint the star and add glitter!
Do you want to make more adorable crafts for Christmas?
Please visit - 7 Christmas Angel Crafts
You can continue to enjoy Christmas activities with your children with this coloring book.


I can’t wait to make one of these for my kids! Thank you for stopping by the Learn & Play Link Up. Your post is featured on Christmas Montessori Network this week!